Deploying PostgreSQL Clusters using Kubernetes StatefulSets
This blog provides guidance on how to build a PostgreSQL cluster using the new Kubernetes feature - StatefulSet. Using this StatefulSet capability provides a very simple, Kubernetes native, mechanism to make clustering decisions when deploying a PostgreSQL cluster.
The Crunchy PostgreSQL Container Suite is a set of containers that can be used to deploy, monitor, and administer the open source PostgreSQL database. More details can be found in the crunchy-containers GitHUB repository here In a prior blog, Crunchy Data described how to deploy a similar cluster using Helm.
(This blog cross-posted at the kubernetes.io blog here)
StatefulSets Example
Step 1 - Create Kube Environment
StatefulSets is a new feature and, as a result, running this example will require an environment based on Kubernetes 1.5.
The example in this blog deploys on Centos7 using kubeadm. Some instructions
on what kubeadm provides and how to
deploy a Kubernetes cluster is located
here.
Step 2 - Install NFS
The example in this blog uses NFS for the Persistent Volumes, but any shared file system would also work (ex: ceph, gluster). Reference documentation for Volumes can be found here.
The example script assumes the NFS server is running locally and the hostname resolves to a known IP address.
In summary, the steps used to get NFS working on a Centos 7 host are as follows:
sudo setsebool -P virt_use_nfs 1
sudo yum -y install nfs-utils libnfsidmap
sudo systemctl enable rpcbind nfs-server
sudo systemctl start rpcbind nfs-server rpc-statd nfs-idmapd
sudo mkdir /nfsfileshare
sudo chmod 777 /nfsfileshare/
sudo vi /etc/exports
sudo exportfs -r
The /etc/exports file should contain a line similar to this one except with the applicable IP address specified:
/nfsfileshare 192.168.122.9(rw,sync)
After these steps NFS should be running in the test environment.
Step 3 - Clone the Crunchy Container Repo
The example used in this blog is found at in the Crunchy Containers GitHUB repo here. Clone the Crunchy Containers repository to the applicable test Kubernertes host and go to the example:
cd $HOME
git clone https://github.com/CrunchyData/crunchy-containers.git
cd crunchy-containers/examples/kube/statefulset
Next, pull down the crunchy-postgres container image:
docker pull crunchydata/crunchy-postgres:centos7-9.5-1.2.6
Step 4 - Run the Example
To begin, it is necessary to set a few of the environment variables used in the example:
export BUILDBASE=$HOME/crunchy-containers
export CCP_IMAGE_TAG=centos7-9.5-1.2.6
BUILDBASE is where you cloned the repository and CCP_IMAGE_TAG is the container image version we want to use.
Next, run the example:
./run.sh
That script will create several Kubernetes objects including:
- Persistent Volumes (pv1, pv2, pv3)
- Persistent Volume Claim (pgset-pvc)
- Service Account (pgset-sa)
- Services (pgset, pgset-master, pgset-replica)
- StatefulSet (pgset)
- Pods (pgset-0, pgset-1)
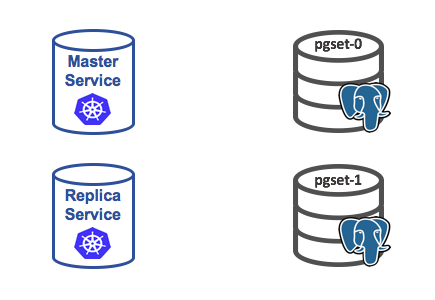
At this point, two pods will be running in the environment:
$ kubectl get pod

NAME      READY   STATUS    RESTARTS   AGE
pgset-0   1/1     Running   0          2m
pgset-1   1/1     Running   1          2m
Immediately after the pods are created, the deployment will be as depicted below:
Step 5 - What Just Happened?
This example will deploy a StatefulSet, which in turn creates two pods.
The containers in those two pods run the database. For a replicating cluster, we need one of the containers to assume the master role and the other containers to assume the replica role.
So, how do the containers determine who will be the master, and who will be the replica?
This is where the new StateSet mechanics come into play. The StateSet mechanics assign a unique ordinal value to each pod in the set.
The StatefulSets provided unique ordinal value always start with 0. During the initialization of the container, each container examines its assigned ordinal value. An ordinal value of 0 causes the container to assume the master role within the database cluster. For all other ordinal values, the container assumes a replica role. This is a very simple form of discovery made possible by the StatefulSet mechanics.
Replicas are configured to connect to the master database via a Service dedicated to the master database. In order to support this replication, the example creates a separate Service for each of the master role and the replica role. Once the replica has connected, the replica will begin replicating state from the master.
During the container initialization, a master container will use a Service Account (pgset-sa) to change it’s container label value to match the master Service selector. Changing the label is important to enable traffic destined to the master database to reach the correct container within the Stateful Set. All other pods in the set assume the replica Service label by default.
Step 6 - Deployment Diagram
The example results in a deployment depicted below:
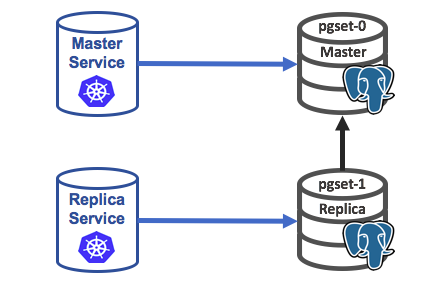 In
this deployment, there is a Service for the master and a separate Service for
the replica. The replica is connected to the master and replication of state has
started.
In
this deployment, there is a Service for the master and a separate Service for
the replica. The replica is connected to the master and replication of state has
started.
The crunchy-postgres container supports other forms of cluster deployment, the style of deployment is dictated by setting the PG_MODE environment variable for the container. In the case of a StatefulSet deployment, that value is set to:
PG_MODE=set
This environment variable is a hint to the container initialization logic as to the style of deployment intended.
Step 7 - Testing the Example
The tests below assume that the psql client has been installed on the test system. If if not, the psql client has been previously installed, it can be installed as follows:
sudo yum -y install postgresql
In addition, the tests below assume that the tested environment DNS resolves to the Kube DNS and that the tested environment DNS search path is specified to match the applicable Kube namespace and domain. The master service is named pgset-master and the replica service is named pgset-replica.
Test the master as follows (the password is password):
psql -h pgset-master -U postgres postgres -c 'table pg_stat_replication'
If things are working, the command above will return output indicating that a single replica is connecting to the master.
Next, test the replica as follows:
psql -h pgset-replica -U postgres postgres -c 'create table foo (id int)'
The command above should fail as the replica is read-only within the cluster.
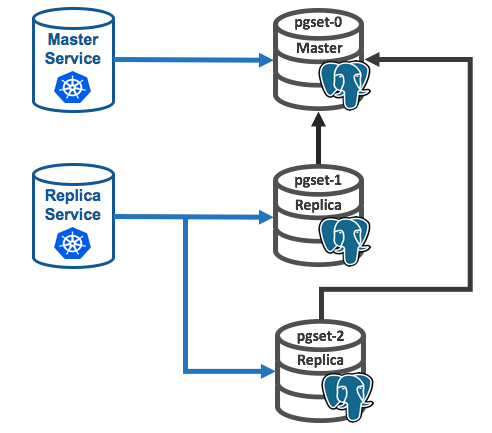
Next, scale up the set as follows:
kubectl scale statefulset pgset --replicas=3
The command above should successfully create a new replica pod called pgset-2
as depicted below:
Step 8 - Persistence Explained
Take a look at the persisted data files on the resulting NFS mount path:
ls -l /nfsfileshare/
total 12
drwx------ 20 26 26 4096 Jan 17 16:35 pgset-0
drwx------ 20 26 26 4096 Jan 17 16:35 pgset-1
drwx------ 20 26 26 4096 Jan 17 16:48 pgset-2
Each container in the StatefulSet binds to the single NFS Persistent Volume Claim (pgset-pvc) created in the example script.
Since NFS and the PVC can be shared, each pod can write to this NFS path.
The container is designed to create a subdirectory on that path using the pod host name for uniqueness.
Conclusion
StatefulSets is an exciting feature added to Kubernetes for container builders that are implementing clustering. The ordinal values assigned to the set provide a very simple mechanism to make clustering decisions when deploying a PostgreSQL cluster.
To learn more contact Crunchy Data at info@crunchydata.com
